Digital Photography and Imaging / Week 5
08.05.23 / Week 5
Name: ALYSSA AISYAH BINTI 'ARIEF NASRAN (0364017)
BDCM
Digital Photography and Imaging (GCD61204) / Section 1
LECTURES
Basic Photography Shooting
Exposure Setting
In this week's lecture, we learned about the basics in photography shooting
Exposure: In photography, exposure is the amount of light which reaches your camera sensor or film.
The main parts of the camera:

Fig 1.0 Camera Anatomy
1. Camera body: The camera body is a light proof box.
- Shutter
- Image sensor
- LCD screen
- Aperture/Iris

Fig 1.1 Exposure Triangle
- Iris
- Shutter Speed
- ISO
There are only two camera settings that affect the actual “luminous exposure” of an image: shutter speed and aperture. The third setting, camera ISO, also affects the brightness of your photos.
Iris: Iris/Aperture controls the flow of light entering the lens. It is measured by f-stops, indicated by sequence of f-number: f/1, f/1.4, f/2 , f/ 2.8, f/ 4, f/ 5.6, f/ 8, f/ 11, f/ 16, f/22 , f/32..
The lower the f-number, the larger the lens opening.

Fig 1.2 Iris/Apertures get smaller as the f-stops increase

Fig 1.3 Iris/Apertures get larger as the f-stops decrease
Shutter: The shutter is a small plastic sheet that opens and closes to allow light onto the film or prevent light from reaching the film. Shutter speed is measured in seconds: 1/1000 s,1/500 s,1/250 s,1/125 s,1/60 s,1/30 s,1/15 s,1/8 s,1/4 s,1/2 s,1 s, 2 s, 3 s…

Fig 1.4 Shutter Speed

Fig 1.5 Shutter Speed Comparison
ISO: Originally referred to the sensitivity of film—it's the "light gathering" ability. For digital photography, ISO refers to the sensitivity—the signal gain—of the camera's sensor. Common ISO camera settings are: 100, 200, 400, 640, 800, 1600, 3200, 6400…
The lower the value the ISO is the less sensitive your camera is to light and the finer the grain.

Fig 1.6 ISO Value Comparison
Lens Perspective
The are wide angle lens, standard lens and tele lens. The appropriate lens for each use provides the desired framing, and the lens choice affects the angle of view. Different lenses are designed for different for different purposes. Lenses can be categorized by focal length.

Fig 1.7 Lens Types

Fig 1.8 Comparing Lenses
Focal Length: The shorter the focal length, the wider the angle of view and vice-versa. Focal length is measured in millimeters from the optical center of a camera lens to the camera’s sensor.

Fig 1.9 Focal Length Demonstration
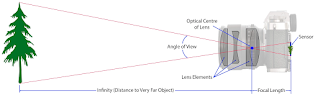
Fig 2.0 Focal Length Diagram
Depth Of Field: The proportion of the image that is reasonably sharp and in focus. The smaller the aperture you use, the greater the depth of field.


Fig 2.2 Lens Aperture Chart
Lenses
- Wide Angle Lens: Ideal for fitting a large area into your frame. They are especially useful for landscape photography or street photography. With wide angle lenses, almost everything is in focus, unless your subject is very close to the lens.

Fig 2.3 Wide Angle Lens
- Standard Lens: Offer a fairly accurate representation of what the human eye sees, both in terms of visual angle and perspective. Images created by standard lens are perceived as more natural than those taken with other types of camera lenses.

Fig 2.4 Standard Lens
- Tele Lenses: Great for isolating a subject that is far away. Tele lenses allow you to photograph subjects from a distance thanks to their magnification.

Fig 2.5 Tele Lenses
DSLR vs Smartphone
Smartphones vs Cameras = Convenience vs Quality
Pros
- Familiar with device
- Good quality
- Easy to learn
Cons
- Still limited
- Good but not great
- Non-ergonomic shape
Cameras are designed to capture images. Phones are designed to carry out a multitude of functions. Phone cameras are very limited by size. The size of the lens and the size of the sensor that captures the photos. Entry-level DSLR have much larger lenses and sensors than mobile phones do.
TUTORIAL
Studio Shooting & Hearst Mansion Demo
Tips for DIY photography studio at home
In this week's tutorial we learned about how we can conduct our very own shooting for photography to edit later on and the tips we should adhere to an keep in mind when shooting and setting up the shooting, thus in class we have watched the video regarding this providing us insight on these topics to help us prepare for our next assignment which we were also briefed about and given a demonstration on.
Small Objects:
- Find a consistent backdrop with natural curves/simple colours/use a piece of paper
- Use a household lamp as a studio light
- Modify lighting e.g. coloured plastic over lamp to achieve coloured lighting/baking paper over lamp to act as a light diffuser
- Large roll of paper fixed to the wall + create a curve
- Place object near window for natural light
- Create a DIY reflector by covering a board with tinfoil
- Create a DIY flash diffuser with a thin plastic container to fix to camera
Large Objects
- Plain/Consistent wall as a backdrop
- Create a DIY softbox with a plastic bin + lamp + tape + baking paper
INSTRUCTIONS
PRACTICAL
Hearst Mansion
In this week's practical we were instructed to create and edit two images into a picture of the Hearst Mansion, one of 'Shazam' as an exercise, and one with a portrait of ourselves following the tutorial given.
Pt 1: Shazam
First, I used the quick selection tool to select the object (shazam) and then applied the layer mask to isolate the object from the background.

Fig 2.6 Isolated Object + Resizing
I then matched the objects colour to the background by adjusting the image luminance, colour intensity, and fade, and added the noise filter onto the object.

Fig 2.7 Matching Object
After this, I created a new layer for the shadow and used the brush tool to draw a black shadow behind the object, added a gaussian blur onto the shadow, and reduced the shadows opacity to 66%.

Fig 2.8 Creating Shadow
Next, I created a new layer for the reflection by duplicating the shazam layer and flipped it upside down, I then adjusted the hue/saturation of the reflection and applied the rippled filter to the reflection.

Fig 2.9 Creating Reflection
Final Shazam

Fig 3.0 Final Shazam
Pt 2: My Reflection
Using the instructions from before, I followed and went through the same steps to create the second part of the exercise with my own photo. The Photo is taken at eye-level.

Fig 3.1 Original Photo
Final My Reflection

Fig 3.2 Final My Reflection
Comments
Post a Comment