Experiential Design / Project 1
24.04.24 - 15.05.24 / Week 01 - Week 04
Name: ALYSSA AISYAH BINTI 'ARIEF NASRAN (0364017)
Name: ALYSSA AISYAH BINTI 'ARIEF NASRAN (0364017)
BDCM
Experiential Design (MMD60204)
INSTRUCTIONS
PROJECT 1
Trending Experiences
For Task 1 of Experiential Design, we were given series of exercises and activities that
explore the current, popular
trend in the market to give us a better understanding of the technologies
and the knowledge in creating content for those technologies.
The requirements are the following:
- To complete all exercises to demonstrate understanding the development platform fundamentals.
Exercise 1
In our first exercise, we had to look a set of images and identify what type
of XR experience it was by determining whether it was AR or MR.

Fig 1.0 1st Image

Fig 1.1 2nd Image

Fig 1.2 3rd Image

Fig 1.3 4th Image

Fig 1.4 5th Image
I had identified image 1, 3, & 5 as AR experiences and image 2 &
4 as MR experiences. The reason 1, 3, & 5 are AR experiences is
because although it is overlaying digital content, such as images and
text onto the users view of the real environment- it is only
interactable through the use of a display screen, such as a tablet as
depicted by the three images. The digital content in AR doesn’t interact
with the real world and remains separated from it, it is contained
within the device's display screen unlike MR which I have identified in
2 & 4. 2 & 4 are MR experiences as it combines elements of
virtual/digital components with the physical world in a way that enables
the virtual/digital components to interact with the real environment. In
MR, the user is able to manipulate and interact with the content as if
it’s part of their surroundings.
Activity 1
For this activity, we had to launch google.com on our phone browser,
search for dinosaur, dog, cat, or tiger, then view it in 3D and in AR
where we can observe a life size model.

Fig 1.5 AR Cat
Exercise 2
For Exercise 2 we are to imagine a scenario in either of the three
places.
- Kitchen
- Shopping Mall
- Gym
What would the AR experience be and what extended visualization can be
useful? What do you want the user to feel?
For this exercise I thought of a Recipe Guidance AR experience where users could see step-by-step visual instructions overlaid on their workspace through their display screen, guiding them through each stage of a recipe. This could include animated demonstrations of techniques like chopping, stirring, or baking.
I made a simple mock-up visual example of how this could work with a simple
guide for egg fried rice, detailing 3 steps with a little mini gif of
stir-frying wok technique.

Fig 1.6 Mock-Up of AR Recipe Guide
In terms of how users should feel, the AR experience should aim to make them
feel alleviated, confident, informed, and inspired. Overall they should feel
more confident in their cooking abilities with the guidance provided, and
satisfied with the efficiency and effectiveness of the AR tools at their
disposal. Ultimately, the goal is to enhance the user's overall cooking
experience and make it more enjoyable and rewarding.
Activity 2
For this activity, it was a group activity where we were divided into 4
groups. We had to make a journey map of a chosen destination and describe the
experience and journey, integrating elements of AR to solve shortcomings of
the journey wherever it was possible. Listing out the gain points, pain
points, and solutions of each stage of the journey.
For our groups (Group 2) journey map, we decided to do a journey map of the
Universal Studio of Singapore Theme Park. To carry out this exercise we
collaborated on miro. The journey map can be viewed in the below image or
through this
link
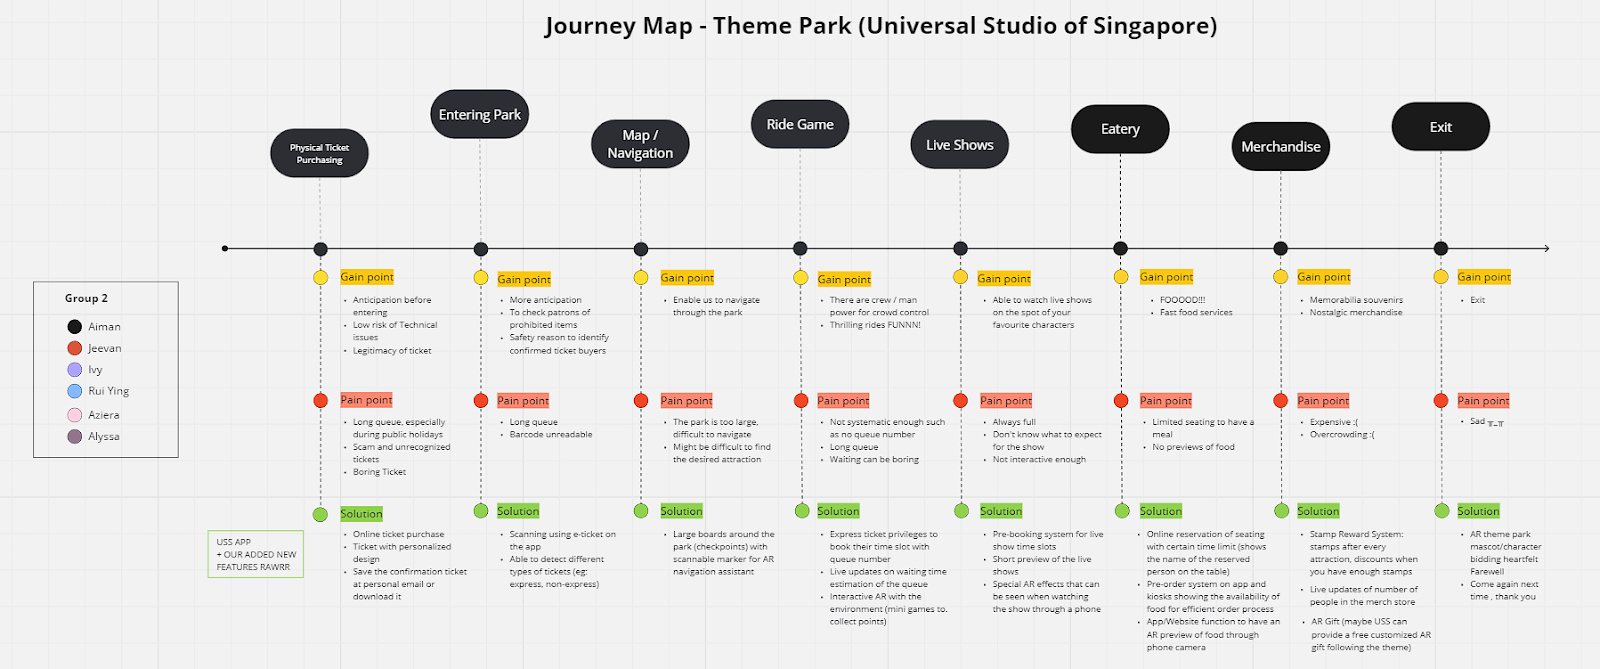
Fig 1.7 Journey Map
Exercise 3
In this exercise, we created a scannable and trackable AR experience using an
image as the target in Unity with the Vuforia Engine. We enhanced the
experience by adding an animated cube that could be controlled with functional
buttons to the AR interface, allowing users to move or rotate the virtual
object.
First, we needed to prepare an image for the target. In order to create the
target, we had to upload the image to the Vuforia website where we could
download the database for it from. Below is the image we used.

Fig 1.8 Astronaut Image Target
The Vuforia website has an function to it that allows you to upload and check
your images/files in the database to see if the image can be scanned properly
in Unity, it runs on a star rating, where 5 indicates that there are no
problems with the image, 3 has minimal problems but is still tricky, and the
rest being bad for scanning.

Fig 1.9 Adding Target in Vuforia + DL Database
- Rich in detail (lots of features that stand out)
- Well contrasted (bright and dark areas)
- No repetitive patterns
- Format must be 8 or 24bit PNG/JPG(RGB/Greyscale) and less than 2MB
Then, starting out in Unity, I downloaded and imported the converted image
into the program as an image target. I also added a 3D object (cube) and set
the position to sit on top of the image and added a feature that would allow
me to use a webcam/phone to scan my image (ARCamera).

Fig 2.0 Adding Image Target + Cube
I could test and see that my image scanned successfully by pressing the play
button at the top, and because I made the 3D object (Cube) a child of the
image, it showed up as a feature of being scanned.

Fig 2.1 Scanning Image Target
Next I created the animation of the cube. To make the animation levitate up
and down, I first started the recording and set the time stamp to half a
second (.30), then I pulled the object up. I needed the object to go down
without resetting to create a smooth animation, so I copied the first
sequence and pasted it on the 1 second marker. This created a loop of the
object going up and down.
However, I noticed that the object was moving too quickly for my liking, so
I adjusted it by stretching out the timeslot in the frames to 2 seconds to
expand the animation time, this would slow the animation and make it move at
a more relatively moderate pace.

Fig 2.2 Adjusting Cube Animation

Fig 2.3 Cube Animation
This is where my animations were stored, I created 2 animations: Static
& Animation. I made it so the first thing you see when scanning the
image would be an unmoving object. Animation is the object in motion,
looping. This is done by right clicking and setting the animation you want
to be the 'entry'. Static was my first animation, so it was the default.

Fig 2.4 Creating Animations
Here I created a canvas through the UI setting in hierarchy and switched to
a 2D viewpoint to make it easier to edit. The canvas is needed for the
set-up of image prompts/buttons. I also made my canvas fit in a 16:9 ratio
and to be allocated for IOS in the Game's tab as that is the phone I use.
Then, I scaled the resolution to a 1080p monitor on the right (1080 x 1920
y).

Fig 2.5 Creating Canvas
Under my canvas I created a button in the expanded UI menu. I then changed
the size and text to 'Move' and linked it to the bottom of the canvas with
the pivot option. After having created my button, I needed to give it
functionality. On the "On Click" menu, I added a new performance and dragged
the cube into the priority slot and gave it the functionality of animation
with the exact name of the animation to allow it to work.

Fig 2.6 Creating Move Button
Here you can see that the button successfully worked at making the object
move in the desired animation.
Fig 2.7 Linking Move Button to Cube Animation
I then went on to create another animation for the cube with the same
principle as the up and down movement. With this one, I would create a
360° rotation recording with a time-span of 1 second. I would then create
another button via copy and paste of the previous button, with the
functionality of rotating the object upon being clicked.

Fig 2.8 Creating Rotate Animatio

Fig 2.9 Object Animation List
Because I had created 2 buttons to make the object to move, I hadn't made
the option to make it stop, so I created a button that would play the
animation 'Static', bringing it to the entry animation. This would give the
user more control over the object and allow them to 'pause' the animation.

Fig 3.0 Creating Static Button

Fig 3.1 Demo of All Buttons + Cube Animations
Exercise 4
This exercise is a continuation from the previous one. It first starts with
the addition of a 3D sphere, plane and then adding the provided video to the
3D Plane.


Fig 3.3 Testing Video
Here I added instructions to the video 3D Plane, so that it would only play
when the device is continuously scanning. I made this possible by making it
so the app would not track the device, so that it would only be activated by
the image.

Fig 3.4 Adding Continuous Scanning

Fig 3.5 Device Tracking

Fig 3.6 Tracking Example
Here I updated the buttons to suit the new project. I also added in
instructions to respond to their appropriate button when pressed/clicked. I
did this by adding in a videoplayer (play) and (pause) on the appropriate
buttons.

Fig 3.7 Adding Play & Pause Buttons

Fig 3.8 Demo of Play & Pause Buttons + Video
I created new buttons with instructions to target the little sphere on top
of the scanned image.
These buttons when clicked would Show and Hide the Object(sphere) for the
viewer.
I did this by setting the buttons to activate and deactivate the 3D Sphere
in the hierarchy.

Fig 3.9 Adding Show & Hide Buttons

Fig 4.0 Demo of Show & Hide Buttons + Video
Here I began to start animating the Sphere, same principle to how I animated
the cube, however I extended the animation time to give it a levitation
effect. This would be it's Idle Animation upon scan.
I also created an animation to stop all animations, by keeping the object
stagnant.
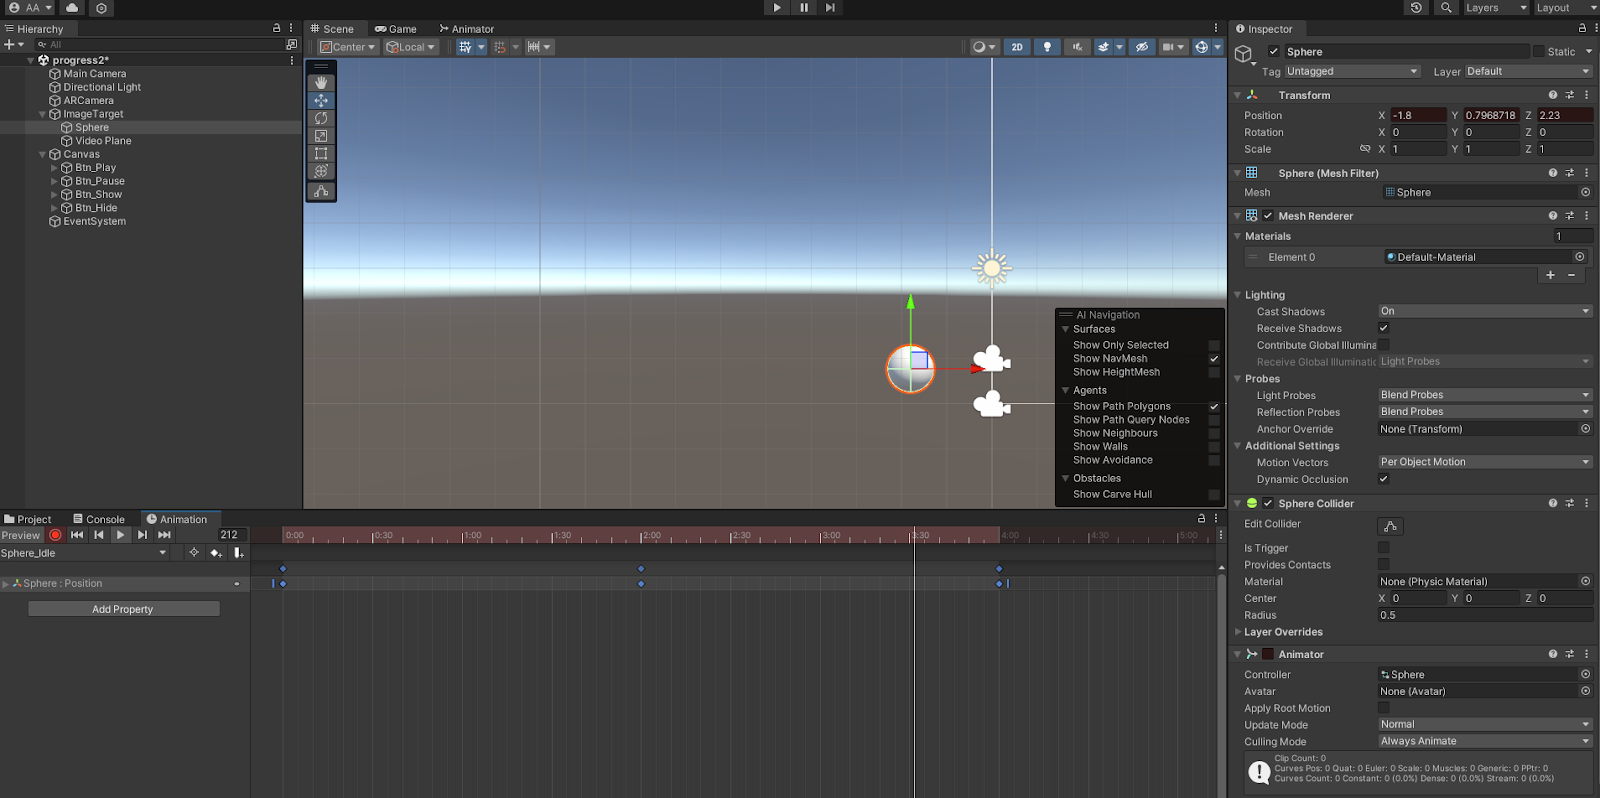

Fig 4.2 Creating Stop Animation
Here I followed with the same principle that I applied to the last buttons,
this time I added in animation instructions and gave each button the
appropriate animations that I had made earlier. Animate would do nothing upon entry, though you could stop the animation
with "Stop Animate" and start it again from the beginning with
"Animate".
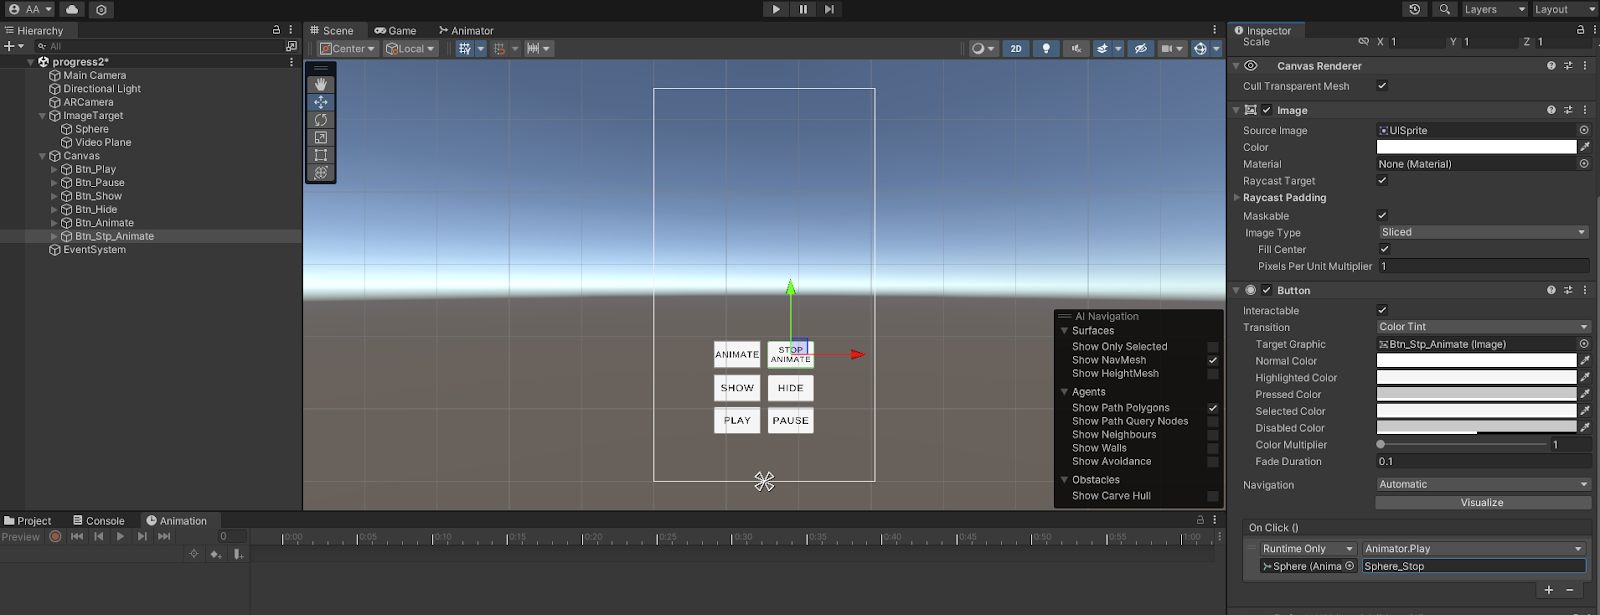
Fig 4.3 Adding Animate & Stop Animate Buttons + Animations

Fig 4.4 Demo of Animate & Stop Animate Sphere Animations
REFLECTION
Reflecting on these exercises, overall it was quite tough as I had to navigate
completely new software's and techniques I'd never learned before. It was my first time using Unity and learning AR nonetheless, the
technicalities of everything are interesting and complex, so its difficult, but
rewarding in the end to see how AR translates onto reality and comes to life.


Comments
Post a Comment